How to install AWG Terminal & Connectors
Reliable electrical connections are the backbone of any wiring project, whether you're building a custom car, installing marine electronics, or setting up industrial equipment. AWG (American Wire Gauge) terminals and connectors provide a secure and efficient way to terminate wires. Doing it right ensures safety, optimal current flow, and long-term durability. Here’s your step-by-step guide to professional installation:
1. Select the Correct Terminal and Tool
Choosing the right terminal and tool is the foundation of a successful installation. Terminals are categorized by design and application:
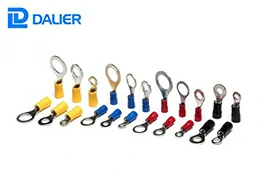
OT (Open Terminal): Ring-shaped for screw-based connections.
FT (Fork Terminal): U-shaped for quick-release applications .
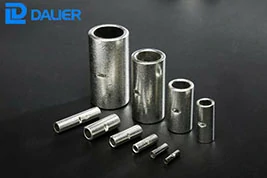
DT (Direct Terminal): Straight pins for PCB or socket integration.
Match the terminal’s AWG rating to your wire size. For example, 16–22 AWG wires pair well with Dalier’s seamless butt splices or insulated ring terminals, which meet UL standards and feature high-purity copper construction . Always verify the terminal’s current and voltage ratings to avoid overload.
Tools:
Crimping Tool: Use a ratchet-style crimping tool with interchangeable dies for precise pressure. For heavy-duty applications, hydraulic or battery-powered tools (e.g., TE Connectivity’s models) ensure consistent results.
Wire Stripper: A precision stripper with adjustable blades prevents wire damage.
2. Prepare the Wire
Proper wire preparation ensures a solid connection.
Strip Insulation: Remove1/2–3/4 inch of insulation, depending on the terminal’s barrel length. Use a stripper matched to your wire gauge to avoid fraying . For stranded wires, twist the strands tightly to maintain conductivity.
Clean the Wire: Wipe the exposed conductor with a dry cloth to remove oxidation or debris. Oxidation increases resistance and weakens the connection.
3. Install the Terminal
Insert the prepared wire into the terminal’s barrel until it touches the stop. For insulated terminals, ensure the insulation aligns with the terminal’s shoulder. Dalier’s insulated ring terminals feature a nylon jacket that protects against moisture and abrasion, ideal for outdoor or industrial setups.
Check Depth: The wire should extend 1–2 mm beyond the terminal’s barrel. If too short, strip additional insulation; if too long, trim excess to prevent short circuits.
4. Crimp the Terminal
Crimping creates a permanent mechanical and electrical bond.
Position the Terminal: Place the terminal’s barrel in the crimping tool’s corresponding die. For dual-barrel terminals, crimp the wire barrel first, then the insulation barrel to secure the jacket.
Apply Pressure: Squeeze the tool until it locks, ensuring the die fully compresses the barrel. A properly crimped terminal will show hexagonal indentations without cracks or loose strands.
Quality Check:
Visual Inspection: Look for even crimps and no exposed wire strands.
Tug Test: Gently pull the wire; it should not slide out. For critical applications, use a multimeter to test continuity.
5. Apply Heat Shrink
Heat shrink tubing adds insulation and strain relief.
Select Tubing: Choose tubing with a 2:1 or 3:1 shrink ratio. For example, 1/4-inch tubing fits 16–18 AWG wires. Dalier’s heat shrink products offer UV resistance and a wide temperature range (-55°C to 125°C), suitable for extreme environments.
Install and Shrink: Slide the tubing over the crimped terminal, leaving 1/4 inch of overlap on both sides. Use a heat gun set to 300–400°F, moving it evenly until the tubing shrinks tightly. Avoid overheating, which causes bubbling or deformation.
Conclusion:
Installing AWG terminals and connectors correctly is a fundamental electrical skill. By meticulously selecting the right components, preparing the wire carefully, using the proper ratcheting crimping tool, and adding heat shrink protection where needed, you create connections that are safe, efficient, and built to last. Never underestimate the importance of precision in this process – a poor crimp can lead to voltage drop, overheating, fire hazards, and frustrating system failures. Invest in quality tools and terminals, follow these steps, and your electrical projects will have a solid foundation.
FAQ
Q1: Can I use regular pliers instead of a crimping tool?
A: Absolutely not. Pliers cannot apply the consistent, calibrated pressure needed for a gas-tight, reliable crimp. This is a major cause of connection failure and overheating.
Q2: How do I know if my crimp is good?
A: Visual inspection is key: full wire insertion, no stray strands, uniform compression in the wire barrel, secure insulation crimp (if present), and the wire doesn't pull out with firm tension. A "pull test" with calibrated equipment is the professional standard.
Q3: What happens if I use the wrong size terminal?
A: Too small: Won't fit or crushes the wire, increasing resistance and heat. Too large: Won't crimp tightly, leading to a loose connection, arcing, and potential failure. Always match AWG sizes exactly.
Q4: Should I solder after crimping?
A: Generally, no. A proper crimp forms a cold weld. Soldering can wick up the wire, making it brittle at the stress point, and isn't required for most applications. Only solder if specifically instructed for the terminal type.